In this post, we will take a look at a Microsoft 365 feature known as Conditional Access. This curious bit of security access control and data protection leaves many administrators perplexed as to its capabilities. By the end of this read, you will have a better grasp on what Conditional Access can do, and better still, what it can do for your journey towards CMMC compliance.
What is Conditional Acccess?
In short, it depends. See what we did there? Conditional? Depends? *Ahem*
Conditional Access (CA) is a powerful tool set capable of examining users and devices at various levels and, depending upon the user/device meeting different conditions and circumstances, granting or denying access to Microsoft 365 resources. Everything from a pre-approved public IP (Internet Protocol) address, such as that associated with a specific physical office, to applying a rigorous set of controls to an individual computer, can be evaluated using Conditional Access.
Microsoft defines Conditional Access as a suite of if-then statements. If a user wants to access something in the Microsoft ecosystem, then they must do something or satisfy a check. Many of these checks are things that we already go through as users of a Microsoft cloud environment. Something like a multifactor authentication (MFA) prompt is one check that is strongly suggested by Totem even at CMMC Level 1 for basic FCI (Federal Contract Information). In this scenario, IF a user wishes to gain access to the cloud infrastructure, THEN they must approve the MFA prompt. Easy right?
Before we go head-first into the dark waters, lets take a moment to analyze why this even applies to CMMC in the first place.
Bottom Line Up Front: The Business Case
Conditional Access has the ability to asses for us a multitude of different things putting us right inline with CMMC Level 2 at multiple points. Let’s unpack a sampling of five individual controls from NIST 800-171A and how Conditional Access can help.
| Designated locations for malicious code protection are identified. |
This one is straight forward. A conditional access policy looks for the presence of a compliance policy that checks the “threat level” that is generated by Defender for iOS. Without Defender being installed, the compliance policy will fail, causing the device to fail the conditional access test, resulting in a denied access request.
| Malicious code protection mechanisms are updated when new releases are available. |
With Conditional Access, we can take into account the precise versioning of the systems connecting to Microsoft. Consider our blog on Bring Your Own Device (BYOD): when a device connects to our ecosystem, we can create a “compliance rule” that checks for what version of iOS an iPhone has installed. If it doesnt meet the minimum criteria, we flag the device as non-compliant. The Conditional Access policy applied looks specifically to only permit devices marked as “Compliant” and seeing this device does not meet that need, does not permit access.
| The identity of each user is authenticated or verified as a prerequisite to system access. |
The root element of Conditional Access is applied here. With each Conditional Access policy, we list off specified users or groups of users which the policy will apply. At the end of the policy, we require a Multi-Factor Authentication (MFA) prompt to verify the identity of the user.
| The identity of each device accessing or connecting to the system is authenticated or verified as a prerequisite to system access. |
We will break this particular control down farther on in this blog. But at the surface level, we can tell Conditional Access to look for specific “hall-passes” that are included in known machines when they are joined to Microsoft Entra (formerly Azure Active Directory). No hall-pass, no access.
| Multifactor authentication is implemented for network access to non-privileged accounts. |
At the end of each policy, we get to apply what are called “Grant Conditions” to each request. One of these is multi-factor authentication. As long as this condition is applied to each policy, we meet the need of this control.
Having the why of Conditional Access firmly in our grasp, we can now unpack the how in the subsequent sections.
Onward!
Going Head-First: RADIUS and Conditional Access
The granularity of access control is the true power of Conditional Access. In order to fully grasp what Conditional Access can do, we must first understand its undoubted inspiration: the tried-and-true Network Policy Server (NPS), more commonly known as RADIUS.
RADIUS (Remote Authentication Dial-In User Service) is a service which can conduct an assessment of a remote user or device to determine its authenticity. Windows NPS acts as a RADIUS server in this way. Let’s think of NPS and its internal policies as a series of fishing nets and the “fish” we are catching are access requests coming from users or devices. The broader the net, the more fish you’re able to catch and manipulate. The fewer or smaller the nets, the fewer fish you catch but the easier it is to manage.
With a wider net (or a broader policy) then each access request maybe assessed for viability against the one large policy in a pass/fail mentality. If the access request is not specific enough, or the policy is not fine-tuned, then users may be given, or denied, access unnecessarily. For something like a Wi-Fi access policy this is fine, but for something more granular such as access to a specific network server; we need something more fine-tuned. Consider a policy that only looks at a username and password to get to a section of a network. This may be well and good for the user element, but what of the computer itself? NIST 800-171A requires device assessment as well. Now we need to validate the condition of each device. With an all-in-one policy it looks cleaner on the admin side but risks the policy not operating properly due to mis-configuration. However, if we setup a series of policies to evaluate a multitude of conditions in pass/fail, we can then do better at evaluating each proper control reducing the risk of a user or device granting access where it should or shouldn’t be. This can also help in the diagnostic process from a logging standpoint.
NPS policies are built on this linear mindset and, as such, are setup in a “prioritization” from one to hundreds. A failure of the first policy will result in the subsequent policy capturing that access request. When a request meets the criteria of a policy, the access request is granted and a connection is made or traffic is allowed to pass through.
The controls around these policies are numerous and can be very granular. Something as simple as usernames and passwords all the way through to specific vendor codes on the signing of the respective NIC (network interface cards) can come into play in making a determination on whether an authentication passes or fails. It is very common in the world of CMMC and NIST 800-171 to utilize NPS for the purposes of MAC (Media Access Control) Address filtering to determine if a given device is known or not as well as a host of other scenarios. A simplified access control request that is sent to an NPS server may look a little like this:
- User – [email protected]
- Password – Alongp@sswordthat1sComPlex
- HostName – JohnniesMainComputer
- MAC Address – 1c:3f:4v:5g:6h:7j
- IP Address – 192.168.50.200
- Windows Version – 19045.4170 (Win 10 – 22H2)
The NPS server will ingest this request as well as (if applicable) the resource that Johnny is trying to access. From here, the NPS server will run this request against a list of policies that may apply to Johnny or his resource. If everything matches, he is granted access. If something is amiss, his request is denied.
Request
- User – [email protected]
- Password – Alongp@sswordthat1sComPlex
- HostName – JohnniesMainComputer
- MAC Address – 1c:3f:4v:5g:6h:7j
- IP Address – 192.168.50.200
- Windows Version – 19045.4170 (Win 10 – 22H2)
Policy
- User – <approved group>
- Password – Alongp@sswordthat1sComPlex
- HostName – <known hostnames>
- MAC Address – <known MAC Addresses>
- IP Address – <approved IP source>
- Min Windows Version – 22621.3296 (Win 11 – 23H2)
In the example above, Johnny’s computer met nearly all the attributes of the NPS policy except for the Windows version that was set as the minimum by the administrator. Johnny’s request would be denied in this case because of that difference in versions and the request would be passed to the next policy or ultimately denied depending on the configuration by the administrator.
On to Conditional Access
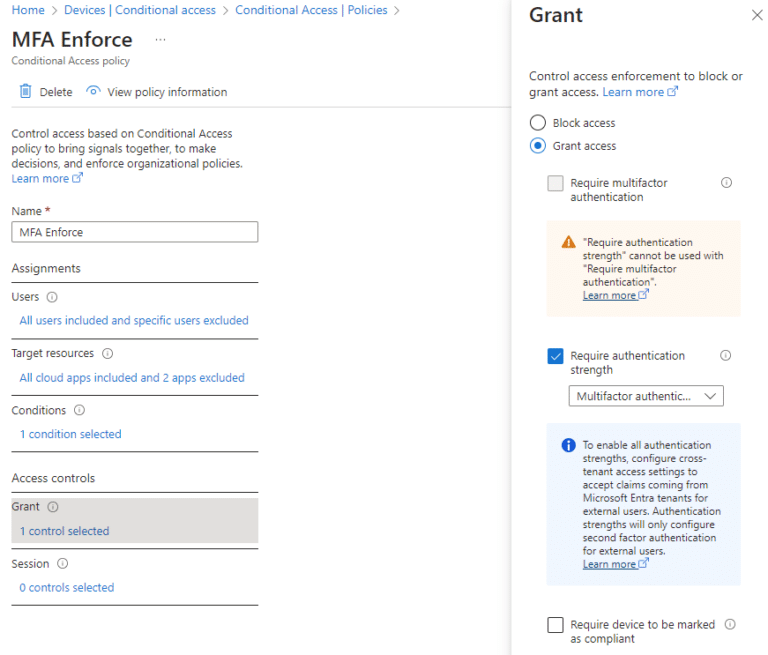
Now lets take the NPS example and compare that to a policy from Microsoft 365 Conditional Access. Within Conditional Access, we have many of the same settings that we found in the NPS solution. Below, we see a simple MFA enforcement policy. Each policy is broken up into two sections, Assignments and Access Controls. Think of Assignments as that “Net” we talked about in the section on NPS policies. A wider net catches more, but can cause more troubles. On the other hand, a smaller net is more focused, but can miss assets, users, or services that should otherwise be in scope.

On the first line under assignments, we see its applicable to all users with a few excluded. These excluded users may be anyone or anything we need them to be. But be wary here, for those pursuing CMMC compliance, processes acting on behalf of authorized users (PAOBOAU) need to be strictly controlled. Take a look at our blog for more info on PAOBOAU’s.
The Target Resources section reflects any software or services hosted in or through your Microsoft 365 environment. Common elements are things like SharePoint, Azure Virtual Desktop (AVD) — a main feature of our ZCaaS enclave, BTW — and the whole of the Office suite. In our scenario here, we’ve selected all cloud applications removing AVD.
From here we start getting into the meat and potatoes of what CA can look at and do.
The Granular Part
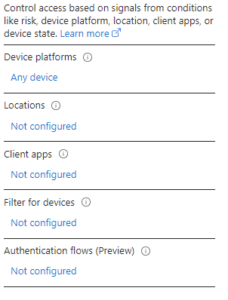
The “Conditions” section is our first window into a new world of assessing a specific set of circumstances for permission into the assets we have specified in the “Target Resources” section.

While it would not be difficult to turn this blog into a textbook exploring each of these functions, we provide a general description of each:
- Device Platforms – allows an admin to manipulate which operating system (OS) types are applied to this policy, things like MacOS, iOS, Windows, or All may all be applied. This part will help with our evaluation against NIST 800-171A 3.1.1[f]
- Locations – are defined by the admin as geographic or IP address and may be compiled into specific lists of trusted locations with unique labels. This gives the admin ability to grant access to a specific resource to only a specific location regardless of if the users has access to this resource or not else where. This control can aid us in evaluation of NIST 800-171A 3.1.3[a]&[e], only access from known locations is approved.
- Client Apps – are defined as the soft-sources from which the request is granted. They are broken into Legacy and Modern Auth clients like Exchange Active Sync and Browser, respectively. Legacy authentication mechanisms in Microsoft are being phased out any way. Ensuring that these mechanisms are blocked preemptively puts us more in line with NIST 800-171A 3.13.8[a]
- Filter for devices – allows the admin to craft a very specific logical SQL rule to look for specific parameters of a device. Elements such as naming syntax are common, looking for a letter moniker or designation such as “ACT-DSK-235” can mean an accounting desktop number 235. The filter device function can be programmed to look for the first three letters of a machine name to match ACT and approve or deny access accordingly.
Take Some Action

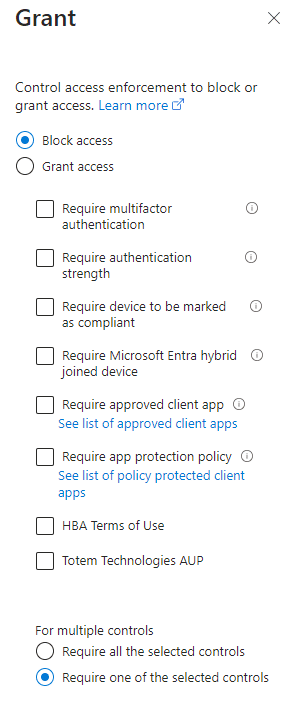
Out of the chute, we see we have a binary choice of “Block” or “Grant”. Taking from the previous section of filtering, the devices that apply to the setup filters, will have the action we choose taken upon it. Take care as “Grant” controls and block controls can overlap, so be wary of going too wide or too lean on your filters.
Let’s assume for a moment we want to create a geo-IP fence around our Microsoft cloud ecosystem. We would first include the appropriate users from the filter section above to “All users” and then under Locations we would create the exclusionary group to look for any users with the declared location of OUTSIDE the US. Once that filter is applied to all users outside the US we then select BLOCK on our access control. Thus BLOCKING all user logins coming from outside the US.
The inverse may also be true, create the same policy but set the location to only be in the US. Then add the Grant control and select “Multifactor Authentication”. This results in only known-users, from within the US, having access to your environment, as long as they use MFA.
In this manner, we can make these solutions exclusionary or inclusionary depending on how we want to structure the ecosystem. A zero-trust mentality requires a deny-first approach, meaning we need to be inclusionary in our posture, requiring us to utilize the second method of geo-blocking rather than the first.
Conditional Access helps with CMMC
Conditional Access makes the application of many CMMC and NIST 800-171A assessment objectives, especially those in the Access Control and Identification & Authentication families, far easier from a technical standpoint. For instance, consider objective 3.5.2[c]:
The identity of each device accessing or connecting to the system is authenticated or verified as a prerequisite to system access.
NIST 800-171A Objective 3.5.2[c]
Not only are we required to identify each device that accesses our covered system, but we are also required to verify its identity PRIOR to engaging with the system. Here we can insert multiple capabilities of Conditional Access to help us in this specific control:
- Users – All users
- Target Resources – All Cloud Apps
- Conditions –
- Filter For Devices –
- device.trustType -ne “AzureAD” -and device.trustType -ne “Workplace”
- Access Controls
- Block
“Hold on there a minute Totem” we hear you say? Yes we set a “Block” for this control, but why? Lets break it down:
- Users – we want everyone who signs into our platform to be assessed by this rule regardless of their role or affiliation.
- Target Resources – This policy applies to all resources in our Microsoft environment.
- Conditions – Here we filter for all devices that do not (note the “-ne” for Not Equals) have tags representing a device which is registered to Entra and is joined fully to our tenancy. In a typical M365 environment, device registration is only done once a device has been approved by an administrator, who then validates approved devices on a regular cadence by examining the list of approved devices in the Entra tenancy, looking for devices which shouldn’t be there. Because each device gets registered to a single user, we can narrow down issues very quickly. This specific condition is the key to this whole control. So if the device does not have the specific tag, they meet this condition and are therefore subject to the Action, which is:
- Action – Block
Thus, any devices which apply to this filter of not being registered and fully joined to Entra are included and subsequently, blocked. In this manner, we ensure that specifically the devices AND users attempting to gain access to our secure system are validated in advance of any access. Combining this policy with other elements like Geo-IP, Check for Compliance, and block unauthorized OS’s makes for a very efficient, and more importantly Hands-somewhat-free approach to ensuring our compliance with 3.5.2[c].
Finally, Conditional Access is an all-yes & one-no type of control. If there are multiple policies being applied to a single access request (a technique that is different from the linear analysis of NPS) then all applied policies must become validated and approved before the access is granted. If even one access policy is not satisifed, the whole access request is denied. Furthermore, the sign-in logs associated with Conditional Access are very helpful in conducting a diagnostic on any denied access attempts that actually should have been allowed.
Bring It All Home
We have chewed through a lot on this blog in a short time. Conditional Access has so much more to offer than we can hope to cover in a quick-format blog. But, for those willing to dive into these waters the benefits are long lasting and can carry an organization much farther and faster on their road to CMMC Compliance with NIST 800-171. If you would like assistance in navigating Conditional Access or any other element of your cybersecurity journey, let’s get in touch and we can find a solution together.
Until then,
Go, Fight, Win!
-Ryan


